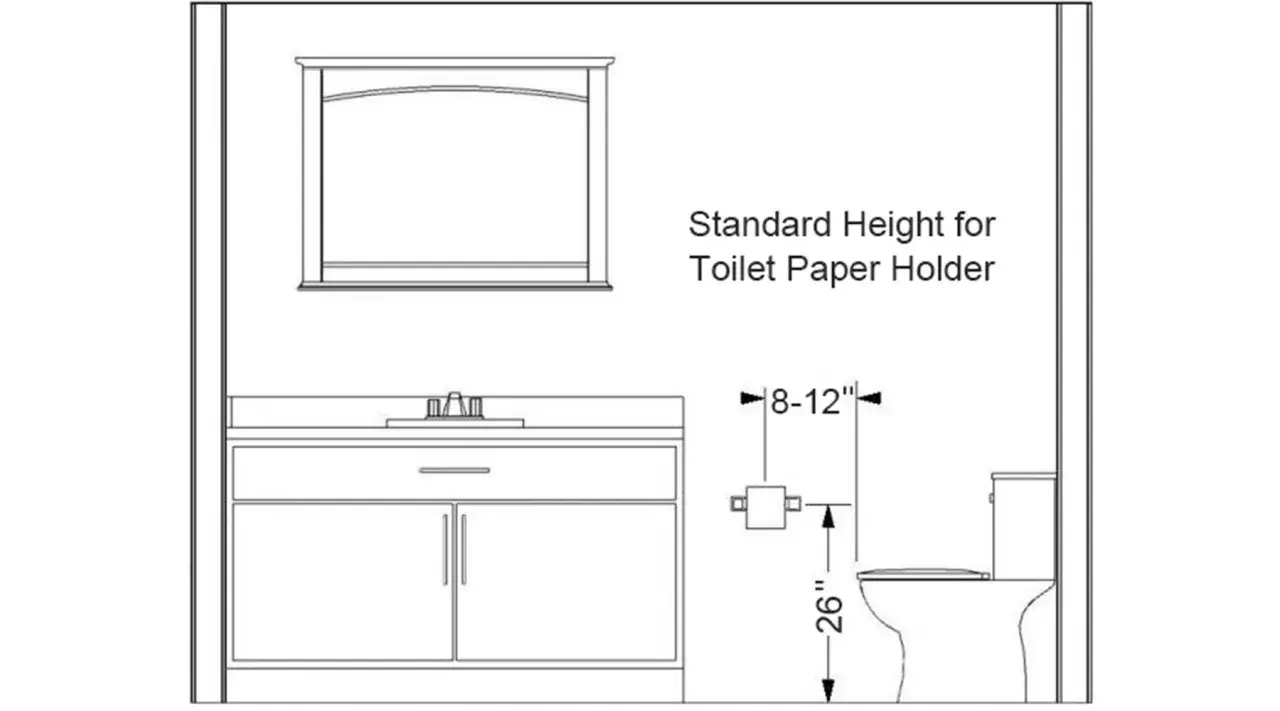
The most reliable starting point is 26 inches to the center
- Standard residential target: place the holder centerline about 26 inches above the finished floor.
- Fore-aft position matters too: set it roughly 8 to 12 inches in front of the toilet bowl edge.
- Measure from the finished floor: not the subfloor, not the rough opening.
- Accessible bathrooms follow different limits: ADA guidance uses a wider height range and stricter reach rules.
- Comfort beats symmetry: a holder that is easy to reach is better than one that only looks centered.
The standard height that works in most homes
For a typical private bathroom, I usually start with 26 inches from the finished floor to the center of the holder. That is the most common residential benchmark, and it works well because the roll sits at a natural seated reach without forcing a shoulder lift or a twist. NKBA planning guidance uses that 26-inch centerline as the default reference, and in practice it lands in the sweet spot for most adults.
What matters here is not just the number, but what the number is measured to. If you are using a decorative ring, a spring-loaded bar, or a recessed dispenser, measure to the functional center of the roll, not to the top edge of the bracket. I also prefer to treat 26 inches as a starting point rather than a law of nature. If the toilet is unusually tall, the user is petite, or the wall layout is tight, a small adjustment can improve comfort more than a perfectly round number ever will. Once that baseline is set, the next question is where the holder should sit in relation to the toilet itself.
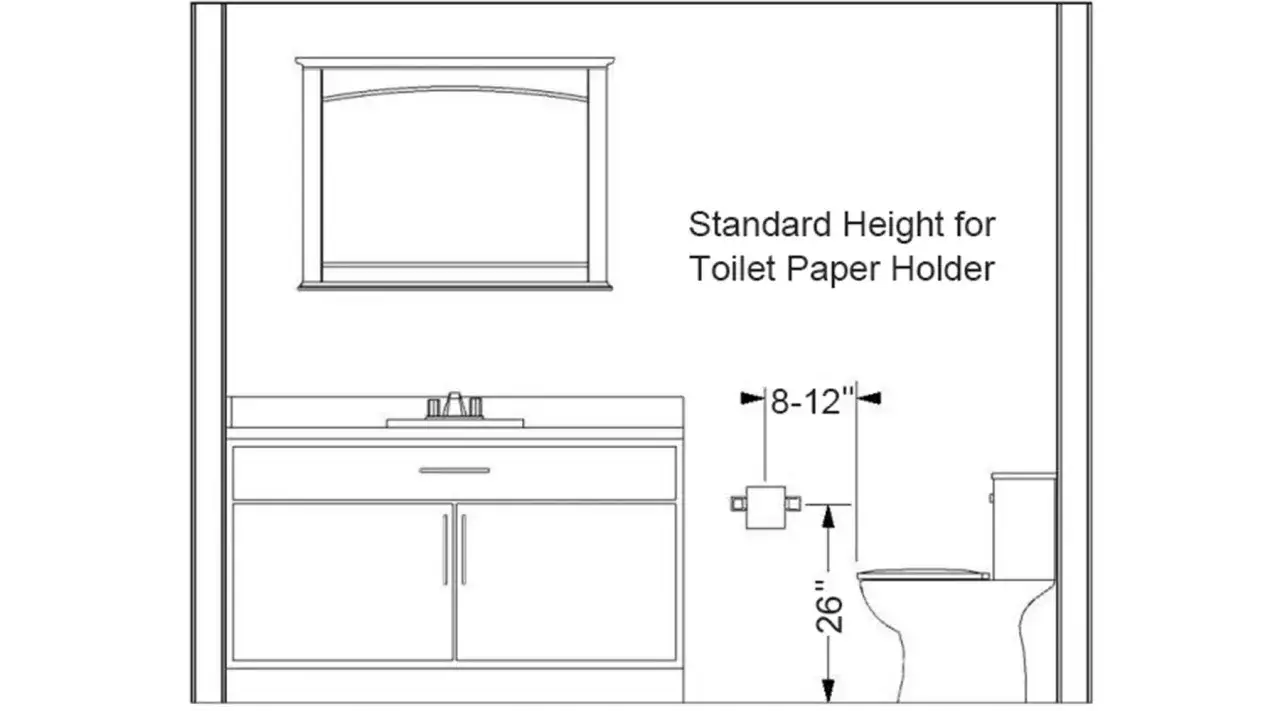
How far it should sit from the toilet
Height is only half the story. If the holder is too far behind the toilet, you end up twisting. If it is too far forward, it can feel oddly detached and may fight with the door swing, vanity edge, or nearby trim. I aim for 8 to 12 inches in front of the front edge of the toilet bowl, measured to the centerline of the holder. That puts the roll in a comfortable reach zone for most seated users and keeps knees from bumping into the wall-mounted hardware.
The cleanest placement is usually on the side wall, slightly forward of the bowl. Behind-the-toilet placement is usually the least comfortable option unless the room is unusually deep or the holder is recessed. If the layout makes the standard side-wall position awkward, I would rather switch to a recessed holder or even a freestanding stand than force a compromise that feels clumsy every day. Good placement should disappear into the routine, not become something you notice each time you reach for paper. From there, the next issue is whether the bathroom needs a more code-aware setup.
When accessibility rules change the answer
In accessible bathrooms, I stop thinking in terms of a single “ideal” height and start thinking in terms of reach, clearances, and grab bar coordination. ADA standards are more specific here: the dispenser outlet must fall within the allowed vertical range, and the holder needs to stay within reachable distance of the toilet while remaining clear of the grab bar. In other words, the holder should serve the user first and the layout second.
If the bathroom is public, shared, or intended to be accessible now or in the future, I would follow the applicable accessibility requirements rather than a decorative standard. That usually means keeping the dispenser within the required vertical band, placing it close enough to the toilet to reach without strain, and confirming that it does not interfere with the grab bar, seat, or turning space. For a homeowner, that can sound fussy, but it is the difference between a bathroom that merely looks right and one that functions well for more people. Once the code side is clear, the real job becomes making the install accurate on the wall.
| Bathroom type | Practical target | What I check first |
|---|---|---|
| Typical home bathroom | 26 inches to center | Seated reach and knee clearance |
| Accessibility-focused bathroom | Use ADA height and reach limits | Grab bar clearance and outlet position |
| Compact powder room | Comfortable side reach, possibly recessed | Door swing and wall congestion |
How I measure and install it without guessing
When I install a holder, I measure from the finished floor, not the subfloor or the framing. That sounds obvious, but it is one of the easiest ways to end up an inch off after tile, underlayment, or a thicker-than-expected floor finish changes the final height. I mark the center point on painter’s tape, hold a mock roll or the actual holder at seated-reach level, and confirm that the arm path feels natural before I drill anything.
My installation sequence is simple. First, I confirm the toilet is already set, because the exact bowl position matters more than people expect. Second, I check for stud placement or solid blocking, especially in a remodel where the wall finish may not support a secure fastener on its own. Third, I make sure the holder does not collide with baseboards, vanity edges, towel bars, or the door opening. If the wall is tiled, I take my time with the drill bit and use the right anchors for the load and substrate. A loose holder feels cheap fast, even if the height is perfect. With the basics set, the last thing to avoid is the kind of mistake that makes a good measurement feel wrong in use.
The mistakes that make a good height feel wrong
The most common problem is measuring to the wrong point. People often measure to the top of the bracket or the bottom of the holder, then wonder why the roll sits too high or too low. I also see holders mounted too close to the toilet back, which forces an awkward wrist angle, and too far to the side, which turns a simple reach into a stretch.
Another mistake is ignoring the room around the toilet. A holder can be perfectly placed relative to the bowl and still feel wrong if it conflicts with a vanity door, a pocket door trim, or a towel hook that crowds the same wall. In accessible bathrooms, the usual error is even simpler: the dispenser gets installed before the grab bar plan is final, and then the two fixtures compete for the same space. I would rather adjust the holder by an inch during install than live with a layout that looks tidy but works poorly. That leads to the version of the setup I would choose most often.
The setup I would choose for a typical U.S. bathroom
If I were setting up a standard family bathroom, I would place the holder about 26 inches from the finished floor to the center and 8 to 12 inches in front of the bowl. That gives you a placement that is easy to reach, visually balanced, and flexible enough for most adult users. If the room is small, I would keep the same height but favor the most comfortable side-wall position rather than forcing symmetry with the vanity or another fixture.
My rule is simple: choose the location that lets someone seated on the toilet reach the roll with minimal twist, minimal shoulder lift, and no collision with nearby fixtures. If you remember only that, you will avoid most of the awkward installs I see in remodels. When the holder is comfortable to use, the whole bathroom feels more thoughtfully built, and that is usually the difference between a fixture that blends in and one that quietly annoys everyone who uses it.