Choosing the right finish for a backsplash or shower wall is less about decoration than about making the installation look intentional. The practical side of subway tile edge options comes down to three things: how the edge looks, how well it protects the tile, and how much labor you are willing to pay for. If those three line up, the whole room feels more finished; if they do not, even expensive tile can look incomplete.
The cleanest edge is usually the one planned before the tile is ordered
- Bullnose is the safest classic choice when you want a rounded, finished perimeter.
- Pencil trim, jolly trim, and metal profiles create a slimmer, more contemporary edge.
- Quarter round works well when you need a soft transition around niches, corners, or curved details.
- Mitered edges give the most seamless look, but they demand a skilled installer and more time.
- Matching trim availability should be checked before you commit to a tile line.
- Movement joints should be caulked, not grouted, at changes of plane.
Why edge treatment matters more than most people expect
The exposed edge is the part of a subway tile installation that tells you whether the project was thought through. A clean termination protects the tile body from chips, hides cut edges, and gives the layout a deliberate end point instead of a chopped-off look. On a backsplash, that usually means the side return at a cabinet run. In a shower, it might be the opening of a niche, the top of a half wall, or the outer corner where tile stops and painted drywall begins.I usually treat the edge as part of the design, not an afterthought. The finish you choose can make the same tile read as traditional, minimalist, handcrafted, or commercial. A rounded bullnose feels softer. A metal profile feels sharper. A mitered corner reads as custom work. That is why the edge detail matters even when the tile itself is simple.
There is also a practical reason to care: raw cut edges are more vulnerable, especially on glazed ceramic or thinner wall tile. Once you see the edge as both a visual boundary and a protective detail, the rest of the decision becomes much easier. From there, the real question is which finish best matches the tile and the room.

The main finishes that work on subway tile edges
There is no single right answer here. The best choice depends on the tile’s body, the room style, and whether you want the edge to disappear or stand out a little.
| Edge finish | Look | Best use | Main tradeoff | Labor level |
|---|---|---|---|---|
| Bullnose | Rounded, finished, familiar | Classic backsplashes, shower walls, tub surrounds | Only works if the collection offers it | Low to medium |
| Pencil trim | Slim, framed, understated | Modern backsplashes, accent edges, niche borders | Subtle, so it may not hide a heavy cut as well as thicker trim | Low to medium |
| Jolly or metal profile | Crisp, clean, architectural | Minimal kitchens, contemporary baths, exposed terminations | The profile stays visible, so finish and color matter | Low to medium |
| Quarter round | Soft, transitional, slightly traditional | Shower niches, outside corners, curved transitions | Can feel dated if the room is extremely modern | Low to medium |
| Mitered edge | Seamless, custom, almost slab-like | High-end minimalist work and visible corners | More fragile and much less forgiving to install | High |
| Hidden raw edge | Invisible when the edge is truly concealed | Ends tucked under cabinets, behind panels, or against another finished surface | Only works if the edge is actually hidden | Low |
Daltile’s trim catalog is a good reminder that many collections offer bullnose, pencil liners, jolly, and quarter round, but not every line includes every piece. In practice, that means the trim decision should happen early, before you finalize quantities or commit to a layout.
For exposed wall ends, Schluter-style metal profiles are popular because they protect the edge and keep the line crisp. I use them most often when the tile line has no matching factory trim or when the room already leans modern and I want the transition to feel intentional rather than decorative.
Once you know the main finish families, the next step is matching them to the room, because the same edge can feel right in one space and wrong in another.
How to match the finish to the room and the tile style
Kitchen backsplashes, showers, and accent walls do not ask for the same solution. A backsplash termination at the end of a cabinet run can usually be handled with a trim piece or a hidden edge. A shower niche, by contrast, needs something that protects corners from wear and makes the opening look finished from every angle.
For a kitchen, I tend to favor bullnose or a slim liner when the tile line is visible from the side. If the tile stops directly under a cabinet or at a painted wall return, a simple hidden edge may be enough. If the backsplash ends in the open, a metal profile or mitered return usually looks more deliberate than a raw cut.
For bathrooms, I think in terms of moisture, touch points, and visibility. Quarter round and bullnose are both useful around niches and tub surrounds because they soften the corner and make cleaning easier. Metal trim works well when the design needs sharper geometry or when the tile collection does not have a matching rounded piece. In a very traditional room, though, too much visible metal can feel out of place.
Tile style matters too. Handmade-look subway tile, beveled tile, and glazed ceramic often look best with a softer trim or a well-planned miter, while rectified porcelain can handle a more architectural profile. If the tile is heavily variegated, the edge detail should not fight the body of the tile. It should calm the layout down.
That brings up the one option people often love in photos but underestimate in real life: the mitered edge. It looks simple, but the execution is not.
When a mitered edge is worth the extra labor
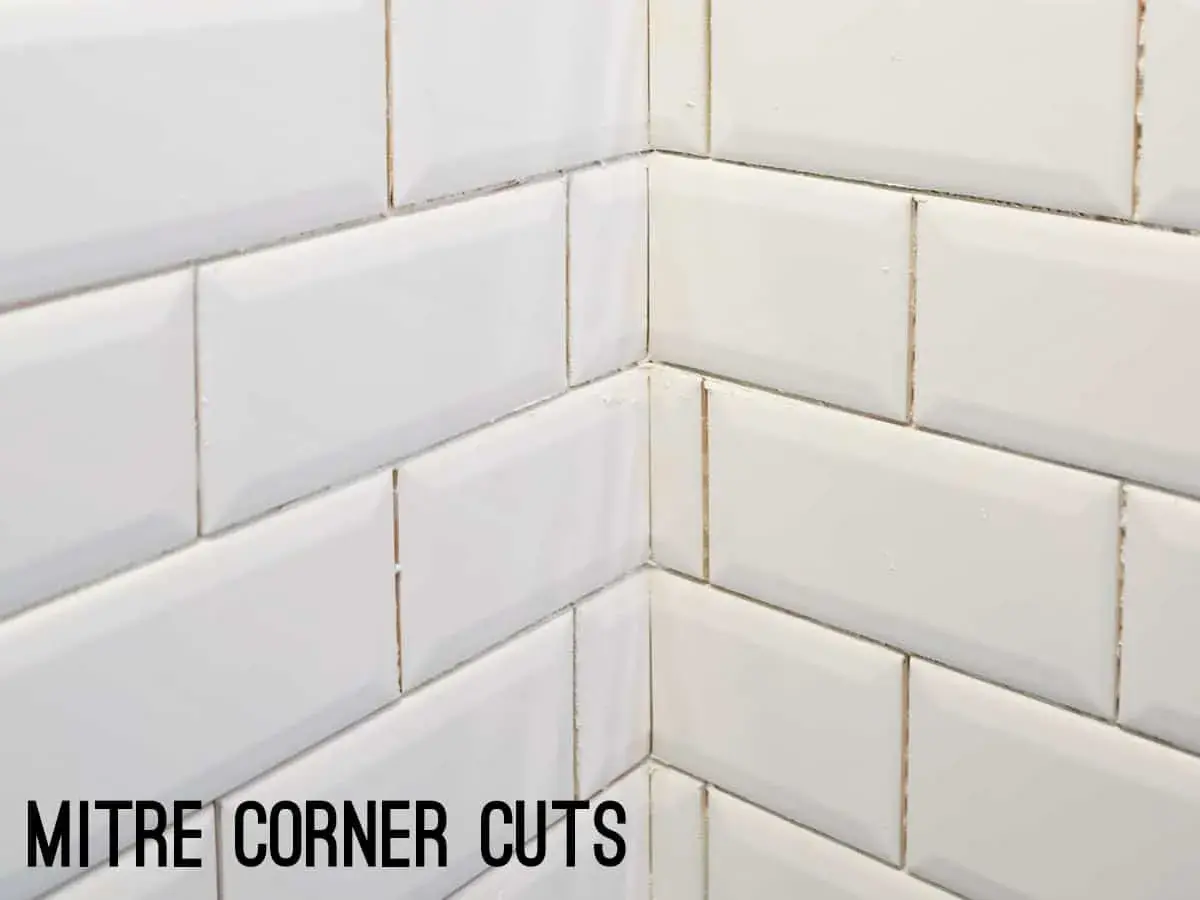
A mitered edge is created by cutting two tile edges so they meet at an angle, usually 45 degrees, to form a clean corner without a separate trim piece. When it is done well, the result is elegant and quiet. The edge almost disappears, which is exactly why designers like it for minimal bathrooms and refined kitchen backsplashes.
I would only choose it when the installer is comfortable with tight tolerances and the tile itself is suitable for the cut. Through-body porcelain, well-made ceramic, and some stone tiles can handle miters better than fragile or highly irregular products. If the glaze is thin, the body color is far from the surface color, or the tile chips easily, the miter can look rough fast.
The other limitation is time. Mitering adds cutting, polishing, and careful alignment. It also increases the risk that a corner becomes the weak point in the installation. On a small feature wall, that tradeoff can be worth it. On a large shower with multiple corners, I usually want a very clear reason before I choose it.
My rule is simple: if the project is meant to feel custom and the budget can support the extra labor, mitering is a strong choice. If the priority is durability and speed, a good trim profile usually wins. After that decision, the installation details become the difference between polished and merely acceptable.
The small installation details that make the finish look intentional
Most edge problems are not caused by the trim itself. They happen because the layout, cut quality, or joint treatment was not planned carefully enough. Before any tile goes on the wall, I want to know where the exposed edge will land, what piece finishes it, and whether the tile line ends at a visually logical point.
- Confirm trim availability before ordering tile, especially if you want a matching bullnose or liner.
- Dry lay the exposed ends so you can see whether the edge lands cleanly at a cabinet side, niche opening, or wall return.
- Check tile thickness and profile depth so the trim does not sit proud of the tile or disappear too far behind it.
- Use color-matched silicone at changes of plane rather than grout, since those joints need movement.
- Keep cut edges consistent if the edge will be visible; uneven cuts stand out more than most homeowners expect.
- Pay attention to the corner geometry, because a profile that looks fine on a flat end may look bulky around a niche or outside corner.
One detail I see missed often is the relationship between the trim and the grout line. If the profile or bullnose interrupts the rhythm of the tile field in a random spot, the wall starts to look improvised. If it lines up with the layout and the grout joints, the edge becomes part of the composition.
That is why I prefer mockups, tape lines, or a small dry layout before installation starts. A few minutes of planning usually saves a lot of regret later. Once the practical side is sorted, choosing the right finish becomes much less intimidating.
The decision rule I would use before the tile is ordered
If I were choosing edge treatment for a real project today, I would make the decision in this order. First, I would check what trim pieces actually exist for the tile line. Second, I would decide whether the edge should disappear or become a feature. Third, I would match the finish to the room style rather than forcing a trendy detail into a traditional space. Fourth, I would compare the labor involved, because the cheapest-looking edge is often the one that was rushed.
- Choose the tile and confirm the trim.
- Decide whether you want a soft edge, a crisp line, or a seamless corner.
- Match the finish to the room’s overall language.
- Check whether your installer has done that edge style before.
- Look at the exposed termination in context, not as a product sample.
That sequence keeps the project grounded. It also prevents the common mistake of selecting a beautiful tile and assuming the edge will sort itself out later. It usually does not. The best-looking installations are the ones where the termination detail was decided while the rest of the design was still flexible.
Edge details are small, but they carry a lot of visual weight. Get them right, and the whole wall feels quieter, cleaner, and more expensive in the best possible way.
The edge details that age best in real bathrooms and kitchens
When I look at finished spaces, the edges that age best are rarely the most dramatic ones. They are the ones that match the material, respect the room, and do not try too hard. A rounded bullnose still makes sense when you want a familiar, finished look. A metal profile works when the room needs a sharper, more current line. A mitered edge is still the premium move when the tile and the installer can support it.
If the tile line is not fully defined yet, I would focus on three questions: does the collection offer trim, will the edge be seen from the side, and do I want the finish to blend in or stand out? Answer those honestly, and the right detail usually reveals itself.
In most projects, the smartest move is the one that looks obvious only after the work is done. That is the real value of getting the edge right: it does not call attention to itself, but it quietly makes the whole installation feel complete.
